Start > Run > optionalfeatures
Check 'Client telnet' > ok
Thursday, July 28, 2011


How to configure gmail account on Windows Live Mail
Windows 7 doens't have anymore Outlook Express. In alternative you can use Windows Live Mail.
Access a Gmail Account in Windows Live Mail Using IMAP
To set up Gmail as an IMAP account in Windows Live Mail:
•Make sure IMAP access is enabled in Gmail.
•Select Go Mail from the menu in Windows Live Mail.
•Hold down the Alt key if you cannot see the menu bar.
•Click Add an e-mail account at the bottom of the list.
•Type your Gmail address under E-mail address:.
•Type your Gmail password under Password:.
•Enter your name under Display Name:.
•Make sure Automatically determine my login ID is checked. (You can verify it is working correctly if the local part, i.e. what comes before the @, in your Gmail address appears under Login ID:.)
•Type your Gmail password under Password:.
•Make sure Manually configure server settings for e-mail account. is checked.
•Click Next.
•Make sure IMAP is selected under My incoming mail server is a ___ server.
•Enter "imap.gmail.com" under Incoming server:.
•Make sure This server requires a secure connection (SSL) is checked under Incoming Server Information.
•Type "smtp.gmail.com" under Outgoing server:.
•Make sure This server requires a secure connection (SSL) is also checked under Outgoing Server Information.
•Also check My outgoing server requires authentication.
•Type "465" for Port: under Outgoing Server Information.
•Click Next.
•Now click Finish.
•Click OK.
•Select Tools Accounts... from the menu.
•Highlight the Gmail account in the list.
•Click Properties.
•Go to the IMAP tab.
•Enter "[Gmail]#Sent Mail" (not including the quotation marks) under Sent Items path:.
•Type "[Gmail]#Drafts" under Drafts path:.
•Type "[Gmail]#Trash" under Deleted Items path:.
•Enter "[Gmail]#Spam" under Junk path:.
•Click OK.
•Click Close.
•Close Windows Live Mail.
•Open Gmail in your browser.
•Select Settings in the top right navigation bar.
•Go to Labels.
•Click Remove followed by OK for the "[Imap]/Deleted Items", "[Imap]/Drafts", "Junk E-mail" and "Sent Items" labels.
•Open your Windows Live Mail folder in Windows.
•Go to the Gmail (user name) sub-folder.
•Open Notepad.
•Drag and drop the account{***}.oeaccount (where "***" represents a long random string) file from the imap.gmail.com onto Notepad to open it.
•Look for the '#' in "[Gmail]#Sent Items", "[Gmail]#Drafts", "[Gmail]#Trash" and "[Gmail]#Spam" and replace it with '/' (always excluding the quotation marks).
•After editing, "[Gmail]#Sent Items" should read "[Gmail]/Sent Items", for example.
•Close Notepad saving the file.
•Start Windows Live Mail.
•Select Tools IMAP Folders... from the menu.
•Choose the Gmail account under Account(s):.
•Click Reset List.
•Now click OK.
•Choose the desired synchronization settings for your folders:
•Click on each folder in succession with the right mouse button in the folder list and choose the desired setting under Synchronization settings in the menu that pops up.
•Do not enable synchronization for [Gmail]/All Mail unless you want Windows Live Mail to download all messages in your Gmail account.
•You can safely turn off synchronization for the Spam and Trash folders.
•Select Tools Options... from the menu.
•Go to the Advanced tab.
•Make sure Use the 'Deleted Items' folder with IMAP accounts is checked under IMAP.
•Click OK.
Access a Gmail Account in Windows Live Mail Using POP
To set up access to a Gmail account in Windows Live Mail:
•Make sure POP access is turned on for your Gmail account.
•Go to Mail under Shortcuts in Windows Live Mail.
•Click Add an e-mail account at the bottom of the list.
•Type your Gmail address under E-mail address:.
•Type your Gmail password under Password:.
•Enter your name under Display Name:.
•Make sure Manually configure server settings for e-mail account. is not checked.
•Click Next.
•Click Finish.
•Click Send/receive in the Windows Live Mail toolbar.
That's it. By now, a Gmail account should have appeared in the folder pane, and if you had any mail waiting in Gmail, it is now in its Inbox.
Access a Gmail Account in Windows Live Mail Using IMAP
To set up Gmail as an IMAP account in Windows Live Mail:
•Make sure IMAP access is enabled in Gmail.
•Select Go Mail from the menu in Windows Live Mail.
•Hold down the Alt key if you cannot see the menu bar.
•Click Add an e-mail account at the bottom of the list.
•Type your Gmail address under E-mail address:.
•Type your Gmail password under Password:.
•Enter your name under Display Name:.
•Make sure Automatically determine my login ID is checked. (You can verify it is working correctly if the local part, i.e. what comes before the @, in your Gmail address appears under Login ID:.)
•Type your Gmail password under Password:.
•Make sure Manually configure server settings for e-mail account. is checked.
•Click Next.
•Make sure IMAP is selected under My incoming mail server is a ___ server.
•Enter "imap.gmail.com" under Incoming server:.
•Make sure This server requires a secure connection (SSL) is checked under Incoming Server Information.
•Type "smtp.gmail.com" under Outgoing server:.
•Make sure This server requires a secure connection (SSL) is also checked under Outgoing Server Information.
•Also check My outgoing server requires authentication.
•Type "465" for Port: under Outgoing Server Information.
•Click Next.
•Now click Finish.
•Click OK.
•Select Tools Accounts... from the menu.
•Highlight the Gmail account in the list.
•Click Properties.
•Go to the IMAP tab.
•Enter "[Gmail]#Sent Mail" (not including the quotation marks) under Sent Items path:.
•Type "[Gmail]#Drafts" under Drafts path:.
•Type "[Gmail]#Trash" under Deleted Items path:.
•Enter "[Gmail]#Spam" under Junk path:.
•Click OK.
•Click Close.
•Close Windows Live Mail.
•Open Gmail in your browser.
•Select Settings in the top right navigation bar.
•Go to Labels.
•Click Remove followed by OK for the "[Imap]/Deleted Items", "[Imap]/Drafts", "Junk E-mail" and "Sent Items" labels.
•Open your Windows Live Mail folder in Windows.
•Go to the Gmail (user name) sub-folder.
•Open Notepad.
•Drag and drop the account{***}.oeaccount (where "***" represents a long random string) file from the imap.gmail.com onto Notepad to open it.
•Look for the '#' in "[Gmail]#Sent Items", "[Gmail]#Drafts", "[Gmail]#Trash" and "[Gmail]#Spam" and replace it with '/' (always excluding the quotation marks).
•After editing, "[Gmail]#Sent Items" should read "[Gmail]/Sent Items", for example.
•Close Notepad saving the file.
•Start Windows Live Mail.
•Select Tools IMAP Folders... from the menu.
•Choose the Gmail account under Account(s):.
•Click Reset List.
•Now click OK.
•Choose the desired synchronization settings for your folders:
•Click on each folder in succession with the right mouse button in the folder list and choose the desired setting under Synchronization settings in the menu that pops up.
•Do not enable synchronization for [Gmail]/All Mail unless you want Windows Live Mail to download all messages in your Gmail account.
•You can safely turn off synchronization for the Spam and Trash folders.
•Select Tools Options... from the menu.
•Go to the Advanced tab.
•Make sure Use the 'Deleted Items' folder with IMAP accounts is checked under IMAP.
•Click OK.
Access a Gmail Account in Windows Live Mail Using POP
To set up access to a Gmail account in Windows Live Mail:
•Make sure POP access is turned on for your Gmail account.
•Go to Mail under Shortcuts in Windows Live Mail.
•Click Add an e-mail account at the bottom of the list.
•Type your Gmail address under E-mail address:.
•Type your Gmail password under Password:.
•Enter your name under Display Name:.
•Make sure Manually configure server settings for e-mail account. is not checked.
•Click Next.
•Click Finish.
•Click Send/receive in the Windows Live Mail toolbar.
That's it. By now, a Gmail account should have appeared in the folder pane, and if you had any mail waiting in Gmail, it is now in its Inbox.
Monday, July 4, 2011
Change Office 2007 serial Key
How to Change your Office 2007 Product Key:
1.Click Start -> Run
2.Type regedit in the box and click OK
3.Navigate to the following path:
HKEY_LOCAL_MACHINE \Software\Microsoft\Office\12.0\Registration
Within Registration, there is subkey that may resemble the following:
{30120000-0011-0000-0000-0000000FF1CE}
4.Under Registration, you might find several subkeys that contain a combination of alphanumeric characters. Each key is specific to a program installed on your computer.
Open each subkey to view and identify the Office product version by the ProductName registry entry in the right pane. For example:
ProductName=Microsoft Office Professional Plus 2007
5.Once you have located the subkey that contains the Office product you wish to change the license key for, delete the following registry entries by right clicking on the registry entry in the subkey, click Delete, and select Yes:
DigitalProductID
ProductID
6.Close regedit
7.Start Microsoft Word, Excel, Outlook or another Office application. Office 2007 should now prompt you to enter a new 25 character product key
8.Enter a valid product key, and click OK
9.If prompted to choose your preferred type of Microsoft Office 2007 installation, select Install Now
10.Microsoft Office 2007 should now be updated with your new CD key
1.Click Start -> Run
2.Type regedit in the box and click OK
3.Navigate to the following path:
HKEY_LOCAL_MACHINE \Software\Microsoft\Office\12.0\Registration
Within Registration, there is subkey that may resemble the following:
{30120000-0011-0000-0000-0000000FF1CE}
4.Under Registration, you might find several subkeys that contain a combination of alphanumeric characters. Each key is specific to a program installed on your computer.
Open each subkey to view and identify the Office product version by the ProductName registry entry in the right pane. For example:
ProductName=Microsoft Office Professional Plus 2007
5.Once you have located the subkey that contains the Office product you wish to change the license key for, delete the following registry entries by right clicking on the registry entry in the subkey, click Delete, and select Yes:
DigitalProductID
ProductID
6.Close regedit
7.Start Microsoft Word, Excel, Outlook or another Office application. Office 2007 should now prompt you to enter a new 25 character product key
8.Enter a valid product key, and click OK
9.If prompted to choose your preferred type of Microsoft Office 2007 installation, select Install Now
10.Microsoft Office 2007 should now be updated with your new CD key
Tuesday, May 31, 2011
Create USB with Multiboot
XBOOT is a Multiboot ISO USB Creator.
It is a Windows based application that can be used to create a Live Multiboot USB or even a Multiboot ISO file that can then be burnt to a CD/DVD.
XBOOT supports many Linux Distributions and Utilities, and allows you to use your choice of a Grub or Syslinux bootloader.
Also included is a built in QEMU emulator (enabling you to boot an ISO from within Windows).
XBOOT – Multiboot ISO/USB Creator
http://sites.google.com/site/shamurxboot/download
Usage Example: Creating a Live Multiboot USB with XBOOT:
1.Download, extract and run the latest version of XBOOT
2.(1) Drag and drop some ISOs into the XBOOT window (2) Select Create USB
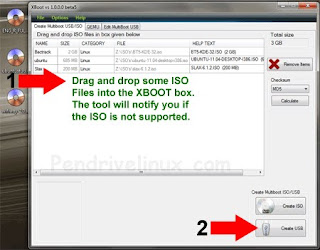
XBOOT – Multiboot ISO USB Creator (Windows)
3.(3) Select your USB Drive from the Droplist (4) Select a Bootloader to use (5) Click OK to begin creation
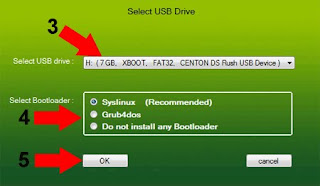
A copy notification window appears to keep you informed of the progress. Once the process is complete, you should have a Bootable Multiboot USB Flash Drive with your ISO selections installed.

It is a Windows based application that can be used to create a Live Multiboot USB or even a Multiboot ISO file that can then be burnt to a CD/DVD.
XBOOT supports many Linux Distributions and Utilities, and allows you to use your choice of a Grub or Syslinux bootloader.
Also included is a built in QEMU emulator (enabling you to boot an ISO from within Windows).
XBOOT – Multiboot ISO/USB Creator
http://sites.google.com/site/shamurxboot/download
Usage Example: Creating a Live Multiboot USB with XBOOT:
1.Download, extract and run the latest version of XBOOT
2.(1) Drag and drop some ISOs into the XBOOT window (2) Select Create USB
XBOOT – Multiboot ISO USB Creator (Windows)
3.(3) Select your USB Drive from the Droplist (4) Select a Bootloader to use (5) Click OK to begin creation
A copy notification window appears to keep you informed of the progress. Once the process is complete, you should have a Bootable Multiboot USB Flash Drive with your ISO selections installed.
Monday, May 23, 2011
SQL Best Practices - HDD Architecture
When possible,which is not always due to financial constraints) use:
C:\ OS
E:\ SQL Binaries
R:\ TempDB (1 file per processor, equi-sized)
S:\ Data
T:\ Log
and
C:\ RAID-1
E:\ RAID-5
R:\ RAID-1 or RAID-10
S:\ RAID-5
T:\ RAID-1 or RAID-10
Working with tempdb in SQL Server 2005
http://technet.microsoft.com/en-us/library/cc966545.aspx
Storage Top 10 Best Practices
http://technet.microsoft.com/en-us/library/cc966534.aspx
Disk Partition Alignment Best Practices for SQL Server
http://msdn.microsoft.com/en-us/library/dd758814(v=sql.100).aspx
C:\ OS
E:\ SQL Binaries
R:\ TempDB (1 file per processor, equi-sized)
S:\ Data
T:\ Log
and
C:\ RAID-1
E:\ RAID-5
R:\ RAID-1 or RAID-10
S:\ RAID-5
T:\ RAID-1 or RAID-10
Working with tempdb in SQL Server 2005
http://technet.microsoft.com/en-us/library/cc966545.aspx
Storage Top 10 Best Practices
http://technet.microsoft.com/en-us/library/cc966534.aspx
Disk Partition Alignment Best Practices for SQL Server
http://msdn.microsoft.com/en-us/library/dd758814(v=sql.100).aspx
Subscribe to:
Posts (Atom)